Monday, September 8, 2008

Graduation Day!


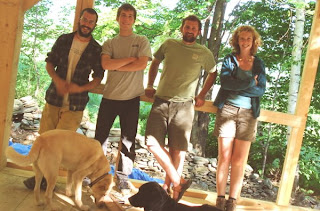
As graduation day approached, we natural builders erupted in a flurry of activity; cleaning up the barn, straightening up the site, adding finishing touches, and reflecting on our collective 11 week experience.  What we shared, what we learned, and how we grew is hard to put into words (which is why it has taken me so long to create this post).  I know that I came away from this experience with a greater appreciation for the natural systems that we are a small part of, a greater respect for the building process, and nothing but admiration for my instructors, new friends, and fellow classmates.
What a joy it was it have our barn filled with live music (thanks to the Yestermorrow String Band), bubbling conversation, tasty food, smiling faces, and positive energy.  Thank you to eeryone who came and participated in our graduation ceremony, making it a truly special occasion.  
And, thanks especially to Deva, Jammin, BG, Julia, Nico, and Natan for making it such a memorable summer.  Bless Up!

Sunday, September 7, 2008

Super Insulation

During our natural walls class we insulated our barn' s walls with a couple different insulation systems.....straw bale, wood chip clay infill, and a light straw clay infill.  But to really create a tight envelope, we also need to insulate our 'feet' and our 'head'.  That is, our floor assembly and ceiling assembly are also in need of an insulative material to make this an energy efficient space for keeping warm in the winter and cool in the summer.  
Blown-in cellulose insulation was our insulation of choice for the floor and ceiling cavities. Cellulose insulation is essentially a recycled newspaper material, treated to prevent mold and protected with a fire-retardant.  At 80% recycled material content, a cradle-to-cradle product, and a high thermal performance, it is considered one of the 'greenest' insulation materials.  For more information regarding the advantages of cellulose insulation over fiberglass batt, go to the following website:  www.cellulose.org/green.html


Plaster Master


Time to get plastered!  
Making our own earthen plasters (a blend of clay, sand, chopped straw, and a little bit of water), we covered our straw bale walls at the barn with a 'scratch' or first coat of plaster.  Our walls needed to breathe and dry a bit before we can finish them with a finish plaster coat. So, we took some time away from the barn  and helped around the YM campus, plastering a cob garden shed with a lime plaster, 
plastered the bridge area above the shop with a high-end plaster, American Clay, 
and learned how to make our own natural paints.  During our last intensive week, myself, Deva, Nico and Natan were anxious to put some finishing touches on our barn, so we mixed up a lime finish plaster,
and gave our barn a most beautiful wall finish.


Sunday, July 20, 2008

Natural Walls - The Remix Edition

Time for a barn-raising!  The last two insulated wall systems for our barn are straw-bale walls.  The bales are stacked in a running bond, secured to our frame with strapping and stakes, and whatever holes and cracks are created between bales are stuffed with light straw clay knot to make these walls as tight as possible.
You can see the black strapping securing the corner bales to the timber frame and exterior framework.  Corners are notorious for blow-out, so this detail is especially important.
Peek-a-boo!  I am working on the inside of the barn stuffing cracks in the wall with a cob mixture (sand, clay, straw, little bit of water) to prevent any thermal breaks.

Look at this beautifully plastered wall!  After stacking the bales and stuffing all the cracks tightly, our bales were well prepped to receive their clay plaster coating.  We first sprayed down the entire bale wall with a super fine clay slip to give our plaster coat a little something extra to stick too.  The plaster is made up of clay, water, sand, and straw, and applied by hand to the entire wall in a slap and smear technique.  

In summary, natural wall systems are fairly similar to mexican food.  Same ingredients, change the proportions, and the name of the dish/wall is different.  You can see that the light straw clay wall, he cob mixture, the straw bale wall, and even the plaster are all derived from the same ingredients....que bueno!

Natural Walls - Take Two

In contrast to the labor intensive light straw clay assembly along our north wall, our south wall is made up of a wood chip and clay mixture.  After the wood chips, wood shavings, and sawdust are mixed together with a clay slip in a mortar mixer, 
they are poured into a double stud wall cavity faced with wood lath.  No tamping required!  The wood lath will later be finished with a lime/clay plaster.  While this wall took far less time to assemble, it also required more wood as a resource - not only in the insulation mix, but also for the lath.  

However, it does provide us with another example of a highly insulative natural wall system made up of what would be considered by-products form the conventional construction industry.

Wednesday, July 16, 2008

Natural Walls - The First Edition

Natural insulation is the name of the game for each of our wall assemblies.  The first wall we tackled is a double stud cavity wall along the north end of our barn.  Taking loose straw from our locally harvested and baled straw bales,
and clay slip (a diluted natural clay and water mixture), we mixed it all together like a vinaigrette over a salad to create a light straw clay.  Once all mixed up, we used flat wood panels as form work and stuffed our wall cavities with the light straw clay mix.  Tamping down all of the mix into the cavities proved to be very labor intensive, but a good way to work out any other of life's stresses! 
 And, it was so satisfying to remove the forms and move them up the wall (slip form), and see the section of the light straw clay stay in place.
This wall has a significant amount of moisture in it (due to the clay slip mixture), so we will be letting it dry out for a couple of weeks before applying plaster to it's surfaces.

Tuesday, July 8, 2008

Gimme Shelter


In preparation for our natural walls class (and after being rained on almost every day), it is time to raise the roof on this barn.  First, we laid 1x18 material (from one of the trees we milled!) above the exposed rafter tails.  This underside of the roof will be visible to the exterior, so we wanted it to  look nice.  Next, we laid 1x4 strapping along the rafters all the way up to the ridge.
Once our strapping was in place, we started hauling our corrugated metal roof panels up the slope of the structure and securing the panels to the strapping with coordinated green roofing screws (with neoprene gaskets).  
In two days we were able to install a roof that is green, albeit not a green roof.

Sunday, June 29, 2008

Stone Masonry - Rock on!

Working with stone to build a 2'-0" high perimeter knee wall was what you might call a strengthening experience.  Gneiss from a local quarry (+/- 5 miles away) was hand picked by Mark, Julia and Jammin' and delivered to our site a few days before the 'walling' began.  Some big, some small, some unbelievably heavy....

Our walls are dry stacked stone walls, meaning no mortar was used in the process.  
We spent a lot of time shaping our stones with mallets and chisels to fit snugly against each other for stability and, more importantly, aesthetics.  Cornerstones were the most critical in the design of the wall, as they most have two good faces, and set the tone for the rest of the wall. 

Ta Daaaa!

Monday, June 23, 2008

Breaker Breaker

Power up.
Time to bring in the electrical service and provide the barn with lights, smoke detectors, and GFI outlets.  We all got our hands in the breaker box, connected up our 3 way switches, and finally got energized.

20 Pennies and Rough Cut Lumber

After gaining some basic carpentry skills in the previous week, we started to put together our exterior wall system assemblies in preparation for our natural wall systems.  Our north and south walls will be a 14" double stud wall with a woodchip/clay insulation mixture within the stud wall cavity.   Our east and west walls will be strawbale.  
So, using rough cut 2x material we framed up our walls, and framed out our doors and windows.

Monday, June 9, 2008

It's Hammer-time!


Time to get some basic carpentry skills mastered and get some flooring in, so we can walk around in our beautiful timberframe barn.  (Like the cheesy photo-op?)

We started the week by framing out our first story floor system.  Oversized 2x12 rough-sawn floor joists with loose underside decking in between will give us plenty of space for blown-in cellulose insulation, creating a super-insulated floor system, sitting about 2'-0" above grade.  

Nico and Ben.......men at work!  Nico is toe-nailing the floor joist into the base of the timber-frame.  The area that Ben is standing in will be floor-less, as it will be a tractor bay for Knoll Farm.

Ahhhh, finally, a floor we can walk on.  The floor is made up of 
rough-sawn 2x8 planks nailed right into our floor joists.  Some may say it looks rough, however, it sure does have the beautiful aesthetic of an authentic barn. 


Sunday, June 1, 2008

Get Framed!

         
Cross-cut saws, chisels, boring machines, and mallets were the tools at hand this week as we learned how to lay out our frame and cut joinery for our timber frame structure. 

Check out this beautiful tenon
      

The first bent of our frame, up and braced.


After cutting out all the joinery for our frame, each bent is assembled on the ground and then tilted up into its correct position onto the sill plate.  The joinery for all of our posts, beams and knee braces is mortise and tenon with pegs made from an ash tree.  The posts are toe-nailed into the sill plate with timber-lock screws.  
We put all of the first floor structure up on Friday afternoon, and celebrated with a group photo, followed by group beers!
    
Saturday morning, the crane showed up at the site, and with his help, we were able to place the ridge beam (with scarf joint) and rafters into place.  I think we were all a little surprised and excited to be putting this large frame together so successfully.  
How special to put together such a  beautiful structure, with a relationship to our frame from start to finish.


Tuesday, May 27, 2008

From Stump to Sticker


We spent the beginning of last week leveling our site, sizing and building formwork, and pouring concrete for our barn's grade beam foundation.  The weather up here is pretty wild: sunny and warm one minute, big wind and horizontal rain the next.  Not the ideal for the the work we are doing, but native Vermonters just shrug and say, "If you don't like the weather, wait 5 minutes, and it will change!"  Nevertheless, we were able to put together all of our formwork, cut and lay our rebar, and get everything level by the time the truck showed up for our pour.  We even had time to learn how to float concrete to get an extra nice surface for our grade beam.
The latter part of the week we spent sourcing more lumber for our project.  We cut down two trees at Yestermorrow's campus, one white pine about 100+ years old, and a hemlock tree about 70+ years old.  After learning about safe felling techniques, our fearless leader Nick, dropped the trees with his chainsaw.  Once down, he limbed the trees (removed all limbs), and then bucked the trees into several different lengths - indicated by our cut list for our barn.  This method gives you the opportunity to waste less wood than buying from a traditional lumber yard.  Some of the limbs of the trees are  even big enough for us to get some decorative pieces out of.
Hauling these large segments of tree from the forest took the majority of Thursday afternoon, and I now know more about logging equipment than I ever anticipated.  An understanding of physics and points of leverage are really helpful tools when figuring out how to move an 800 lb. tree, as well as the right tools!
Friday, we spent milling our trees into lumber for our project.  As a professional sawyer, Nick has his own portable sawmill, the Wood Miser.  It really is pretty amazing to watch a tree trunk transform into lumber.  Once cut to size, the lumber is placed on 1x furring strips, known as stickers, above the ground.  This technique allows the lumber to dry, and control (and prevent) warpage.  Our lumber will not be kiln dried for this project, so we need to take extra care in our stickering process.  Staggering the stickers is a big no-no, as this will cause uneven drying and deformation.

What a View!

The view from our jobsite is absolutely breathtaking.  Knoll Farm sits up high, overlooking the Mad River Valley with sweeping views of the local ski mountains, the Mad River, neighboring farms, and lots and lots of beautiful forest.  

Sunday, May 18, 2008

Tree Hugging and Dirt Loving


The first week's foray into the world of natural building was action packed!  We spent the week discussing our current environmental situation, conventional building practices, the green building trend, and natural building styles and techniques.  After many site visits and slide shows, we finally had an opportunity to get down and dirty by building large scale models of natural wall systems.  After collecting all of the materials needed for our models in our local environment (straw from a local farm, wood from our campus forest, clay from the side of the mountain across the street) we divided into two groups to build a post and beam structure with straw bale infill walls , and a stud frame wall system with wattle and daub interior finish, and a woodchip/clay insulation system in the wall cavity .  Creating a natural plaster for the straw-bale walls from clay, sand, and water was by far the most enjoyable part of the entire week. (Next week, photos of these models will be posted for your viewing pleasure!)

The project for this year's Natural Building Certificate/Intensive program is to build a barn at Knoll Farm for the Center for Whole Communities.  Over the past couple of weeks, the site has been cleared of trees, and excavation and trenching have begun.  The trees from the site are being milled at Yestermorrow's campus for the structural frame of the barn.  

This coming week, we will be pouring a 8" concrete grade beam for the barn, while also evaluating all things good, bad, and ugly about concrete.....

Vermont is absolutely beautiful, and I am fortunate to be surrounded by positive and inspired people.  I am working out the kinks with this whole blogger technology, and you can look forward to seeing some photos in the future (once I get my card reader for my camera!)